- FACE |
- EYES |
- SKIN |
- WHAT'S NEW?
Disclosure: As an associate of Amazon and others, I may earn commission on certain purchases.
Face Massage for Firmer Skin
The secret to getting the most from your facial exercise program is a face massage.
NEW: Watch the face massage video at the bottom of the page...
A quick 2 minute face massage is relaxing, but the best part is the face firming benefits you gain - especially around the hollows of the cheeks and lower half of the face.
You can do this massage any time you wish, however, it is highly recommended to do this quick massage right after facial exercises.
For an Extra Bonus -
Consider....
If you suffer from blotches, skin spots, brown spots, rough flaky patches or just dull skin consider adding a renew intensive skin therapy facial a few times a month.
This is a great combination for a beautiful, smooth complexion. And, it's much cheaper than professional facials.
It's becoming clear that the dermis - just like muscles - can atrophy and the old saying "use it or lose it" is true about our skin too.
Massages and exercises
can help keep skin flexible
Many people are afraid to touch, handle, or massage their face for fear of causing more wrinkles or damage.
However, facial tissues actually improve with "gentle" massaging and exercising.
The proper
technique can result in a firmer, more elastic skin that will also look
smoother too because it can help fill out wrinkles and lines.
Final Massage Tips
Make sure your face and hands are clean. If you skin is very dry, you can add a little massaging oil or your favorite anti-aging cream. I like to use organic vitamin C serum.
This helps to work the vitamin rich serum deep into the pores and help create tighter and brighter skin.
Vitamin C helps to inhibit
excess melanin production so you can reduce brown spots, blotches, and
dark patches - enhancing your tone and complexion.
Ok, Get Ready to
Start Your Massage
Click here for more information about face massage and exercises.
Got Chubby Cheeks?
Got chubby cheeks or a double chin?
Learn how to get a sexy sculpted face in just a few weeks. Learn how to use face massaging to slim down a wide face, reduce chubby cheeks, double chin, and get a leaner, firmer sculpted face - without plastic surgery.
Click here to learn more for more information......
Home › Glowing Skin Tips › Face Massage

Popular Articles

Watch how I reduced crepey skin under my eyes....
As an Amazon Associate I earn from qualifying purchases. Other links on this site may lead to other companies I'm associated with.

Recent Articles
-
Easy Eye Solutions - Under Eye Lines & Crepey Skin. See My Results!
Jun 29, 21 04:20 PM
Easy Eye Solutions Instant Eye Tuck Serum. Free Shipping & Sample Sizes. See before and after video -
Crepey Skin Remedies - Natural Cure for Face, Eyes and Neck
Nov 04, 20 02:53 PM
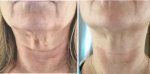 Crepey Skin Remedies - Crepey skin can be reversed naturally at home. See before & after pictures of my results.


